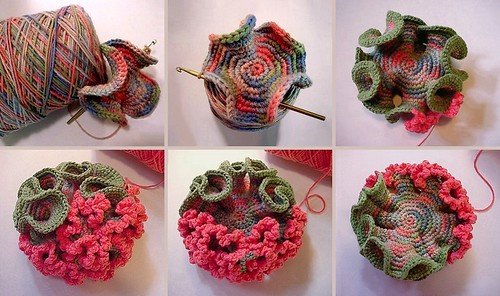
This article is a step by step guide, of the processes involved when crocheting ruffles.
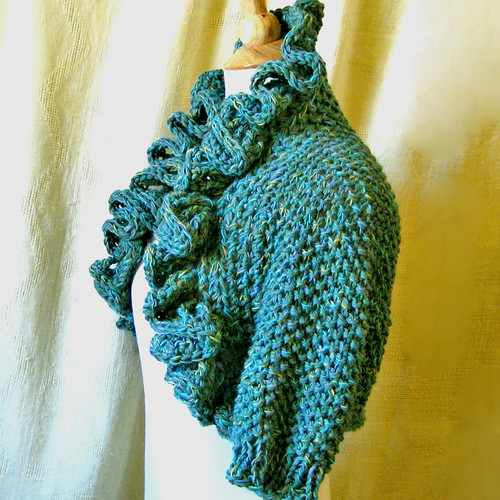
Crocheted ruffles generally add that beautiful, visual texture to generally any crocheting project. Adding just a few rows of basic stitches, can dramatically transform patterns on pillows, blankets and children’s clothing. Basically, the ruffle forms when multiple stitches are created on the same stitch base, hence making the design to ruffle. One of the most common favourite stitches among those familiar with the art of crocheting is the double crochet.
Below is a step by step guide to help you learn how to crochet ruffles.
(Parenthesis are used to indicate repeated instructions in a specific row)
• Step 1
Start by selecting the yarn colour. Choosing the right yarn colour combination is crucial, as it helps achieving some great aesthetic value, if well balanced. Finding the right colour is almost like an art. It will also be important to select a good quality yarn .When in doubt, It is advisable to seek advice from someone more experienced in the art. Try to select a colour, and skein matching the weight of the thread to be used.
• Step 2
Before you start on the crochets, it’s important for you to consider choosing stitches that perfectly complement the overall design for the ruffle. This may vary greatly from project to project. For example, if it is a pillow with close, tiny stitches, a narrow ruffle may be more appropriate, so as to accentuate your entire piece, without trying to overwhelm the piece in the process. If it is for example a skirt, a wider ruffle may be the better choice.
• Step 3
In Row 1, Single Crochet in each Stitch with 3 Single Crochets at each corner, and then connect with Slip Stitch in the 1st Single Crochet. This will set a line of stitches in the selected ruffle colour. Alternatively, you can start at Row 2 in the garment, especially if your ruffle is of a similar colour to the garment.
• Step 4
In Row 2, turn (Single Crochet, Chain 2, Skip 1) around, and then join the Slip in 1st Single Crochet, but do not turn. This round will set a beginning for the design and texture features for the ruffle.
• Step 5
In row 3, Single Crochet in connecting stitch, (3 Double Crochets in Chain space, Single Crochet in Single Crochet) around ending in Slip Stitch in 1st Single Crochet, do not turn. The next row will help form depth to the ruffle.
• Step 6
In Row 4, Single Crochet in connecting stitch, (Double Crochet in 1st Double Crochet, 2 Double Crochet in 2nd Double Crochet, Double Crochet in 3rd Double Crochet, Single Crochet in Single Crochet) around ending with Slip Stitch in 1st Single Crochet, and finish off.
Useful tips
• You can easily increase or reduce the volume of ruffles through increasing or decreasing the number of stitches. For example, if you prefer more dramatic ruffles, it would be advisable to use a 3 Double Crochet in 2nd Double Crochet, during row 4 of crocheting, as opposed to the 2 Double Crochet as in the pattern above.
• The effect of the ruffles can be changed by continuing to add rows beyond the 4 described above. Increase your ruffles to produce continued ruffle effects.
• If working with flat items, you should always double your stitches at the corner pockets. For example if you are using 4 Double Crochets as the pattern above, use 8 Double Crochets at the corners.
The outlined ruffle pattern is one of the fairly basic crochet patterns, and it is advised to strive to experiment with the technique, so as to give it a more creative touch.
This article was written by arts and crafts blogger Sue. She spends much of her spare time knitting and crocheting and loves finding new patterns to try out.


Hello, have you this diy in french ? Thank you.
Unfortunately I don’t, but I will look into getting it translated!